Making Candles and B&B products
This section is a How To on soy candle making as well as some other bath & body products that I've developed. It contains recipes, tips and ideas for making these and other crafts.
Getting artistic with soy wax
You will need to use either soy pillar wax or soy votive wax for the following project. You can't use the same soy wax that you use for jar candles, because it isn’t hard enough to stand on its own. Soy pillar and votive waxes are regular soy wax with an additive like palm wax or stearic acid to harden it. One thing you should know about soy wax is that it may discolor over time. I want to warn you that I have found that pillar or votive soy wax can develop a pinkish hue over time. A color/UV stabilizer might help, but I personally have never tried it.
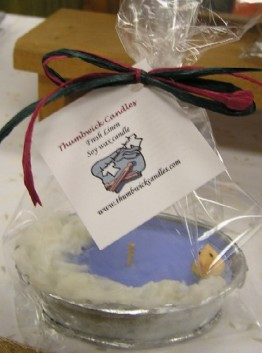
Making soy rubber ducky washtub candles: This can be really fun and appeal to your creative side. I used to make small soy candles in metal washtubs, and top them with whipped soy to look like soap suds and little rubber ducks made from yellow soy wax. I've seen these candles done with gel, but I wanted to make them with soy wax, so I did.
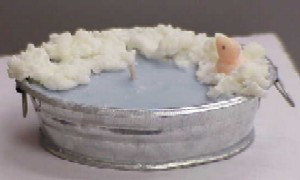
- First make a regular soy wax container candle in a mini galvanized metal washtub. Seal the inner seams with silicone caulk or some other sealant, so that the hot wax doesn't leak out of the container. This is true of most metal containers for candle making. Tint the wax blue with candle dye to resemble water. Test various wick sizes to obtain the optimum burn. If the container is oval, you should consider using two wicks. See this website for a neat wick testing method: https://www.moonglowcandles.com/projects/i-wickslab.htm.
- Next you want to whip the soy wax soap suds. You will need a hand-held electric mixer with beaters that you aren't ever going to use for making cookies again. You will also want a medium plastic bowl that is reserved for only this purpose too. You can usually find these things really cheap at a second hand or thrift store. You will also need to use pillar soy wax for this. Heat wax until melted, transfer to the plastic bowl and immediately whip with the electric mixer until it is thick, frothy and forms peaks. If you’ve ever beaten egg whites to make meringues, you know the consistency I am talking about. Work quickly at this point, because the open time window is really short. Using a fork, transfer small amounts to the top of your candles and sculpt it to resemble soap suds on the surface of water. When the wax gets too hard to work with, melt it down and whip it again. This technique can also be used to make whipped cream or froth for “drink candles”.
- You can buy wax embeds or you can make your own embeds or shaped votives with soy wax. You will want to purchase some type of silicone mold making material for this project. You need to create a flexible mold so that it is possible to remove the shape later. It is also possible to use a rigid mold material and bind two sides of the mold together, but the silicon mold is the method that I used. Here is a website from Smooth-On that shows how to make and use candle molds: https://www.smooth-on.com/Candlemaking/c1237/index.html. If this seems like too much work, you could always just buy your wax embeds from someone else. I made my own, because almost all embeds available are made from paraffin wax, and I wanted to use only soy wax. Initially I bought some paraffin wax embeds of rubber ducks and then used them to make a mold for new embeds. Once you have invested in mold-making material and made your molds, you might even want to branch out into the soy wax embed making business, as there is definitely a need out there for soy wax embeds. Remember that you have to use a soy pillar or votive wax to make your embeds, or they won't be hard enough to hold up in hot temperatures.
- Add your “rubber ducky” embed to the top of the candle. Heat up the bottom with a match to make it stick. Now your candle is done and ready to package. These make really neat baby shower centerpieces and prizes. They also go great in a new baby gift basket.
Making the perfect jar soy candle
Ok, so maybe it's not a perfect candle, because nothing is perfect, but here is my process for making an awesome “16 oz.” jar soy candle. 16 oz. is in quotes, because the jar really holds 475 ml by volume, and you wouldn't fill it completely up to the top anyway. Plus, it doesn't really weigh a pound either. I spent three years perfecting this soy candle making technique, and I'm giving you the recipe for free, right here, because I think everyone should have safe, well made soy candles to enjoy.
Needed materials:
- Soy wax pastilles. I bought my wax from Enchanted Lites. I blended a natural additive called Panalite in at 1/2 Tbsp per lb to make the wax a bit harder and more stable, but you could save the hassle by trying their Millenium blend, which is also really good, and already has additives.
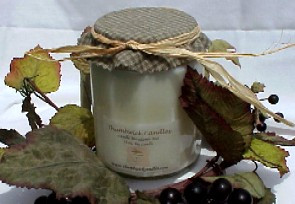
- 475 ml 12-sided glass jar: these are often called 16 ounce Classic jars. They sometimes come with a gold screw-on lid. I covered the lid with fabric and raffia to give it a homespun look. One place you can buy these from is Lone Star Candle Supply You'd want to find a company close to you, to save on shipping costs.
- Appropriately sized pre-tabbed wick: I started out using German coreless CD16 wicks from Nature's Garden, then switched to RRD-47 wicks from Just By Nature, and finally changed to ECO-10 wicks from Candle Science. All of these wicks work really well for this sized jar with soy wax with additive. The ECO wicks do mushroom more than the other two, but nothing horrible. You want a nice clean melt off the sides, but the glass shouldn't get so hot that it might crack. If you are worried about the jar getting too hot to touch, you might want to go down one wick size just to be safe.
- Candle fragrance oil (optional): I love fragrance in a candle, but some people are sensitive to it, which is why I say optional. I have purchased fragrance oils from many different supply companies, and found none of them to be bad. Choose a company that will send you free or very inexpensive samples, so that you can try them before buying a large quantity. I found Enchanted Lites to be really easy to work with. They have great customer service.
- Other items: You'll want to use a wick sticker, and something to hold up the wick while the candle is setting up, like a wick holder or a popsicle stick. You also might want to put a label on your candle, and you ALWAYS want to put a warning label on the bottom. Candle dye is also optional.
Steps:
- Weigh out your wax pastilles and melt them in a double boiler, or in a Presto pot (A Presto 6 Qt. Kitchen Kettle Multi-Cooker, which you can find at most department stores for around $20). The nice thing about soy wax, is that you can melt it in a Presto pot, whereas paraffin needs to be melted in a double boiler, for safety reasons, and it seems to take forever to melt. Soy wax melts very quickly in a Presto pot, so you should carefully watch with a candy or candle thermometer, to not let it get too hot and smoke. You might scald the wax then, and it will be a darker color. Some people say you should melt the wax first, and then throw in your additive (Panalite, stearic, or whatever you want to use), but I throw it all in at the start. It seems to melt the same either way. Bring the wax to around 160 degrees F.
- Measure the melted wax into a measuring container. A Pyrex measuring cup works well, but so does a 500 ml graduated flask, which you can get from a laboratory supply company. That's what I use, and they are very sturdy, as long as you don't throw them around. You will want about 375 ml of wax for your container. This, together with fragrance oil, should fill the container right up to the spot where the side curves in at the top.
- Weigh the fragrance oil, hereafter referred to as FO. Actually do this step while the wax is melting. I found about .7 ounces to work very nicely, that's point 7, not 7 ounces:-) You could go up to a whole ounce, but it probably isn't necessary. Use a small electronic scale to accurately weight the FO. You can't really go by volume, because some FOs are heavier than others. You want to go by weight to get the right percentage of FO to wax. Your goal is around 7%.
- Right after you measure the melted wax, add your FO slowly to the same container, stirring constantly. Keep stirring for 20 - 30 seconds to completely incorporate the FO into the wax. Allow the melted wax to cool to about 120 - 130 degrees F. If you want to add candle color/dye, add it right before the FO, while the wax is at its hottest.
- Do this while the wax is cooling. Apply the caution label to the bottom of your jar, and apply your wick, with the wick sticker in the center of the bottom of your jar. Center your wick and hold it steady with the wick bar or popsicle stick.
- Slowly pour your prepared wax into the jar. Pouring it very quickly may develop bubbles. Soy wax is tricky, and may develop air pockets within the candle. I always touched up the tops of my candles with a heat gun after they cooled. This eliminates any air pockets near the surface. Sometimes you just get air pockets no matter what you do, and I gave up trying to find a way to pour or cool them without craters and pockets, and just used a heat gun. Its easier than trying to control the elements, and a lot less maddening.
Once your candle is hardened and cooled, it's done. Try this method and combination of materials and see if you don't agree it makes the best soy candle ever.
Appearing Scene Wickless Candle
When I first created my wickless Appearing Scene soy candles back in 2004 other chandlers wanted to know my process. Because I was selling them, I kept my secrets guarded so that I could be assured of exclusivity. I spent a lot of time on research and development of this candle. Below is a step-by-step process on how to make a wickless Appearing Scene soy candle, and the hurdles that I had to overcome in designing it. You may be wondering why I'm giving this information away now. Well, I want people to be encouraged to visit my site, and I have no reason to keep it a secret anymore. If you find this information useful or have questions, please contact me.
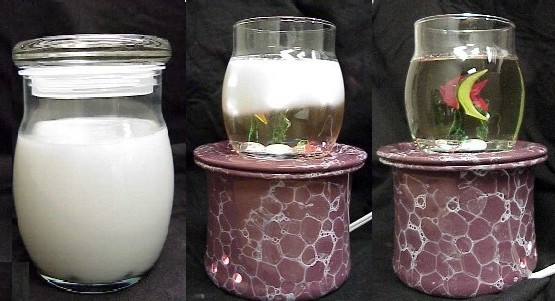
First of all, what is an Appearing Scene wickless soy candle, and what makes it unique from other wickless candles? A wickless candle, also sometimes called a flameless candle, works basically like an air freshener. It is a candle jar filled with scented wax. You put the jar on a warming unit, and when the wax heats up and melts, it releases the fragrance into the room. It takes between 1 1/2 and 2 1/2 hours for all of the wax to melt, depending on room temperature. When you turn off the warming base, the candle will slowly become solid again. A wickless candle is much safer than a regular candle, because there is no flame to risk starting a fire. Wickless candles also have better scent "throwing" ability than regular candles, because all of the scented wax melts, as opposed to just a small pool on the top of the candle. Plus, additional fragrance oil can be added to a melted wickless candle when the scent begins to fade. This makes a wickless candle an awesome value, because it can last for a very long time.
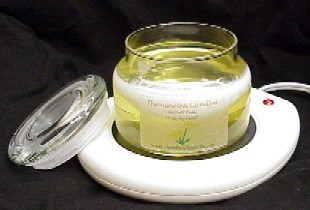
If there is a glass scene inside, such as in an Appearing Scene wickless candle, the scene will be revealed as the wax melts because soy wax becomes clear when melted. The benefit of using soy wax as opposed to paraffin wax is that soy wax has a lower melting temperature, thus it will not take as long to melt and begin releasing fragrance. The glass scene inside gives the candle maker freedom to create custom designs, and to be more creative.
How to make an Appearing Scene wickless soy candle
Step 1 - Choosing materials
- Container: The jar that you use is the most important choice for your candle. You need to be sure that you are using a glass jar that can withstand being brought up to a wax melting temperature and cooling many many times over without cracking. If you buy cheap, fragile glassware, it will be a safety risk, or at the very least cause someone's antique table or expensive Persian carpet to be ruined by melted wax if it ever cracks. After durability you need to consider dimensions of the jar. This is an area where I did extensive testing, so that I can tell you that you want a jar that is no taller than 4" with no larger than a 14 ounce capacity. The problem with a tall, skinny jar, is that it will take too long to melt the wax on the top. The problem with a wide, short jar, is that you are limited as to what embeds you can use. Anything too tall will stick out the top. A 14 oz. bulb jar works really well. A 10 oz. apothecary works even better, except that most embeds will be too tall for it. Once you have found the perfect jar dimensions, you will need a reputable glass dealer. I recommend Libbey glass, because their candle jars are very durable. Make sure that you get samples, so that you can check the durability of the jar and test it for speed of melting.
- Wax: Well of course I am going to say that soy wax is the best to use, because that's what I use. I do have several reasons why I think it is superior in wickless candles though. First, because it has a lower melt point than paraffin wax. Second, because it cleans up more easily than paraffin wax if it spills. This is a benefit to me when cleaning up after I pour candles. It would also be a benefit to someone who's child tips over a melted candle. Soy wax does have a downside in wickless candles too. The chemical bonds in hydrogenated soybean oil (i.e. soy wax) are somewhat "flimsy". That is my non-chemist, layman's description of it. Soy wax can sometimes get what is referred to as "bloom" by soy wax chandlers. Once in awhile, and I don't know what the conditions are that cause it - be it temperature, humidity or what - soy wax will get a funky cauliflower-like appearance on the surface when it hardens. Most of the time you can melt it, and it will harden with a nice smooth surface, but every once in awhile, the surface of your wickless candle will cool and harden to look like a mini volcano. There are additives that you can use to stabilize soy wax, but keep in mind that they will all increase the melting temperature of the wax, and that's undesirable in a wickless candle. You want it to melt as soon as possible so that it can start releasing scent and to show the scene inside. The bloom problem is really just cosmetic though, it isn't a safety issue.
- Fragrance Oil (abbrev. FO): I can't tell you how essential oils would work in a wickless candle, because I never tried them. I was always nervous about the higher flashpoint close to a heat source. I always worked with candle fragrance oils. There are a lot of them out there to play with, and this is probably one of the best things about wickless candles - their awesome scenting ability. When all of the wax in a candle melts, as opposed to just a pool on top, you can release a lot more fragrance. Most chandlers who work with soy wax will tell you that about 7% is as much FO that soy wax can "hold" before it ends up as oily spots on the surface of the hardened wax. I've found this also to be true. If I make a candle with 12 ounces of soy wax, I will add about .8 ounces of FO by weight. The easy calculation for this is: Take your weight in wax, divide by 100, multiply by 7. This gives you 7%, or the amount of FO to add. I like to use soy based FOs with soy wax. I find that they incorporate into the wax better. Other chandlers may say that soy base FOs are just marketing hype. All I can say is, try it for yourself and see what you think. If I find a fragrance that I love, and it's not soy based, that's not going to stop me from using it. Some will claim that wax can only hold so much fragrance, and even when that fragrance is gone, you won't be able to add more past a certain point. I totally disagree with this. I have wickless candles that I've been re-melting for over two years now, and I am still able to add more fragrance to the wax when it fades.
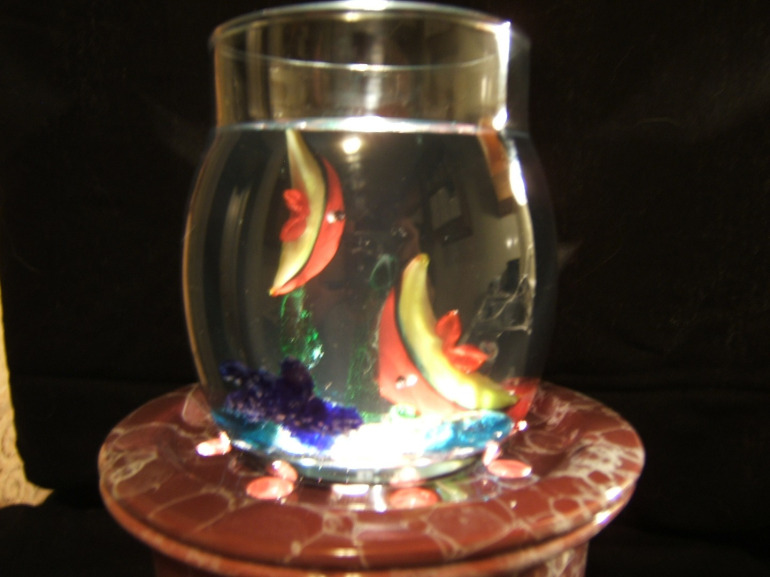
- Embeds: Glass embeds are small colored glass figurines that work really well in a wickless candle scene. Most of them will be manufactured in China, and anything handmade by artisans is really expensive. Ceramic embeds can also work, but only if they are completely glazed, and not at all porous. Just do an internet search on "glass embeds" and you will find lots of examples. You need to know the dimensions of the embed to make sure that it will fit in your candle jar, covered by the wax. This way it can "appear" when the wax melts. It's really nice if the embed is free standing, or has a base. If it doesn't you will have to glue it in place. See my discussion on glue below. You may be tempted to put other things in your Appearing Scene candle. I've tried this and without much success. Seashells will add impurities to the candle and cloud the wax - even if you wash and boil them clean. Sand and flowers, don't even try it. Fake flowers might work, but I doubt it. I've never tried it though - I am basing my hunch on all the other things I've tried. Plastic embeds may melt or warp over time. The wax really doesn't get that hot, but it's still a possibility. I think a hard plastic might work though. It just wouldn't look as classy as glass, in my opinion. Also, those colored glass vase gems are really nice on the bottom of your candle. They add color, if you've got an illuminated candle warmer.
Here are a few scenes I've done with embeds:
Step 2 - Scene preparation
First you will need to set up your scene in the candle jar. If all your embeds will stand up stably on their own then great. If not, you are going to need something to adhere them in place. I did a lot of research on different adhesives that might withstand being in melted wax. Here is a list of glues that I have tried, and whether they worked or not:
- Super Glue - bond breaks down over time in melted wax.
- Ceramic glue, Cyanoacrylate - same as Super Glue, and the thought of breathing this in didn't seem too healthy.
- 2 part epoxy adhesive resin - this actually held pretty well, but was messy to work with.sin - this actually held pretty well, but was messy to work with.
- Silicone adhesive - pulled away from the glass in melted wax.
- UV curing glass glue - this worked really well, but had to be cured a day ahead in bright sunlight. This was my glue of choice.
Even with glue, you will only get a vertical hold, you will never get any horizontal weld to hold, such as trying to adhere something to the side of the jar.
Once you have your scene arranged, glued and fully cured if necessary, you are ready to pour in your scented wax.
Step 3 - Preparing and pouring the wax
Tip: Don't add color to the wax. You may be tempted to do this, but this will only serve to give the wax a murky look when it melts, and obscure the scene within. Look at the picture of the Fantasy scene above to see what I mean. Soy wax has a natural yellow tinge to it when it melts. It looks like cooking oil, because that's actually what it is - with a higher melt point. My suggestion is to make peace with the color, because you just won't be able to get the wax to look like water by adding blue dye, no matter how much you want to.
Start by melting your wax. If using soy wax, bring your temperature to about 155 degrees Fahrenheit. This is a good temperature to incorporate fragrance, because it opens the wax molecules, and allows the fragrance molecules to bind better, but it isn't so hot that you will lose some of the fragrance to evaporation. My my non-chemist, layman's description (so any of you chemists out there want to tell me I don't know what I'm talking about - well you are probably right) but that is the point I've found where the FO incorporates the best with the wax. After mixing in your FO, allow the wax to cool to around 120 - 130 degrees F. Then you can slowly pour it into your jar with your pre-set scene. Be careful with this step, because you don't want to upset any embeds. It will take a couple hours for your candle to harden. Then it is ready to sell, give as a gift or use.
A note about packaging: You will want to provide a lid with your candle, because it keeps out dust when the candle isn't being melted. You may not notice it at first, but eventually you will see pieces of dust and hair floating in your melted candle if you don't keep it covered when not in use. If you are going to sell a wickless candle, or even give one as a gift, please include safety and usage instructions. This is a good practice. You may even use mine if you want.
All content, writings and photos on this website are the property of Margaret Palecek.
Please do not share any of it without referencing me and this website.